Make an AI chatbot
You have probably noticed how quickly chatbots have proliferated in the last few years and months. The rapid adoption of chatbots has been made possible not just by the open-source LLMs (Large Language Models) but also thanks to low-code platforms such as n8n.
Large Language Models are neural networks trained on large datasets and can detect patterns in them. Thanks to that ability, they can predict characters or words that would plausibly follow in a sequence.
The low-code platform is a coding environment with a graphical user interface (GUI). Some coding without the use of GUI is possible.
What is great about the low code approach is the flexibility it gives you. While you can use the drag-and-drop to speed up common tedious tasks, you also have the freedom to add custom code if needed. You can quickly test things out, but also build a fully-functioning application.
In this article, you will learn how to pull the data from your text-based document, insert it into a vector database, and use a combination of OpenAI LLM and vector embeddings to build a fully-functioning AI chatbot, able to predict the correct answer from the user input.
Types of chatbots
Chatbots can be grouped into two main categories:
- Rule-based chatbots
- AI chatbots
The previous generation of chatbots, which we might define as rule-based chatbots, has been with us for a while. These chatbots would only provide answers to specific questions and often caused frustration in users.
Rule-based chatbots use a sequence of if-then statements by checking the presence of keywords to match the user question to the corresponding answer. A huge drawback of this approach is the complexity of natural language - users can ask for the same thing in many different ways and accommodating all possible scenarios is tricky.
On the other hand, AI chatbots can recognize synonyms and similarities, so the user is not restricted to a specific question to get the correct answer, resulting in a much more enjoyable interaction and better search results. This is possible thanks to Large Language Models such as those provided by OpenAI.
Top software to build a chatbot
- n8n
n8n allows you to easily connect to a wide variety of external services and tools. This means you are not locked-in to a particular vendor or platform. You can attach various popular databases available on the market. Additionally, you have the option to write code in Python or JavaScript. - IBM Watsonx Assistant
- Dialogflow from Google
- Amazon Lex
- Chatfuel
How do I make my own chatbot with n8n?
In n8n, it is possible to build rule-based chatbots as well as AI chatbots.
To create a rule-based chatbot, you need to implement a workflow containing a chain of if-then statements.
To create an AI chatbot, we create a workflow connecting all building blocks - called nodes in n8n - LLM, vector embeddings, vector store, and a document from which we'll pull custom data. Vector embeddings allow us to convert words into a set of numbers known as vectors. Vectors are then saved in a Vector Store, a database dedicated to storing vectors. To set this up in n8n, you can just add a node and your credentials.
To find out more about building a chatbot in n8n, check our article How to create an AI bot in Telegram.
Prerequisites
You don't need to be an expert in n8n, nor in building chatbots - our mission to simplify technical complexity for you. It would be helpful if you have some basic familiarity with:
-
building workflows in n8n
-
HTTP terms, LLM, vector embeddings, vector store:
You don’t need a deep-level understanding of those concepts, a high-level overview is sufficient.To follow this tutorial step-by-step, you'll also need:
-
OpenAI credit (at least 5$ to get the API key)
-
Supabase set up ( a document table ready to be referenced)
-
A document published online so that you can copy and paste its URL
If you prefer, you can use other Language Models and Vector Stores than those used in this tutorial. n8n has built-in capabilities to connect LLMs and vector embeddings from OLLama, HuggingFace, Google PaLM, and others.
You can also add a node to connect to Vector Stores such as Pinecone, Zep, or Qdrant.
Use Case
Queries from prospective students about the university entry requirements can flood the administration departments. We can easily automate this process, by creating a chatbot dedicated to these specific questions based on the document provided by the university, with the list of their unique requirements.
This document doesn't need to be formatted in any particular way, almost any text document is acceptable. What counts, is that the information that you expect a student to ask about the entry requirements is included.
Similar scenarios would include using internal company data and building a chat helping to onboard new employees or reply to customers’ questions relating to company-specific policies.
Any scenario that requires a user to sift through a large document to find certain information is a great opportunity to simplify the process and build a chatbot.
We’ll use the combination of LLM and Vector Embeddings from OpenAI with the Supabase Vector Store. The data from the University website is in JSON format but you can also work with PDFs, ePub, docx, CSV, or even plain text files. For this workflow, the document needs to be published online, without any access restrictions. This document needs to be inserted into the vector store.
We’ll create two workflows:
- Insert your document into the Supabase Vector Store.
- Create the AI chatbot using OpenAI LLM.
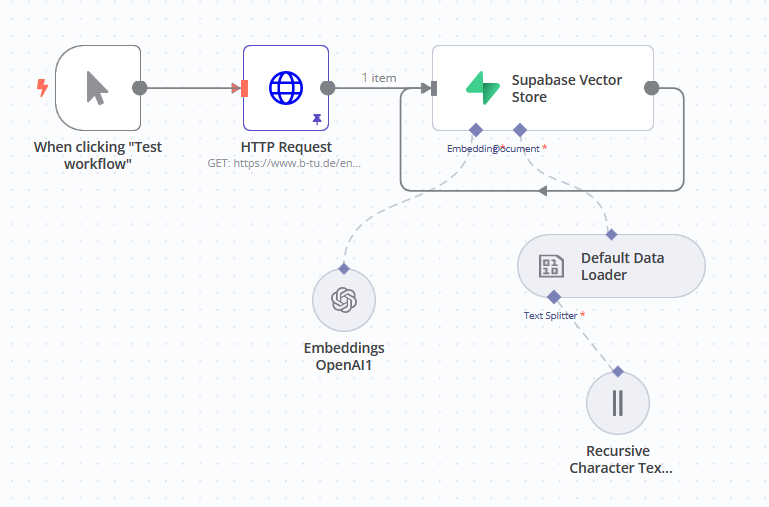
1st workflow: Insert your document into the Supabase Vector Store
In this workflow, we'll insert a document containing our custom data and insert it into the vector store. Vector embeddings allow us to convert a text document into vectors. Thanks to the text splitter the text is sliced into manageable chunks. At the end of the workflow, our database table is filled, and we can reference processed vector data to build the actual chatbot.
-
Add a manual trigger.
Click the Add first step. In the nodes panel select Manually. -
Retrieve your document.
Add HTTP request node.
In the popup window, add the URL of your document data. -
Connect Vector Store.
Simply type Supabase in the nodes panel and then choose Supabase Vector Store. Add your credentials if not added during the initial setup.
In the Operation Mode, select Insert Documents.
In the Table Name dropdown, select your Supabase table.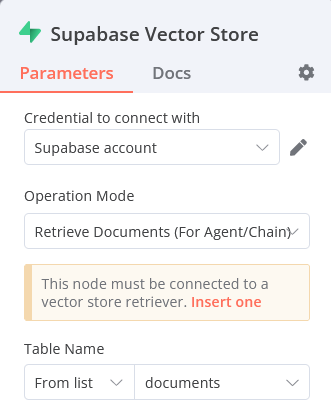
-
Add OpenAI Embeddings.
Click the + button attached to the Supabase Vector Store node to add Vector embeddings. Embeddings from OpenAI is our pick, but you also have the option to easily integrate other embeddings if you prefer. -
Add Data Loader.
Click the Document node and then select the Default Data Loader.
Adjust the settings in this step according to the data you are requesting via HTTP. JSON is the default data type, but you have the option to load other document formats.
To load other document formats, in the Type of Data select Binary. Under Data Format you can choose from: CSV, docx, epub, PDF, or even plain text files. -
Add Text Splitter.
As the last step in this workflow we’ll add Recursive Character Text Splitter.
You can adjust the Chunk Size and Chunk Overlap.Now that our document has been inserted into a Vector Store, we can create the actual AI chatbot in a new workflow.
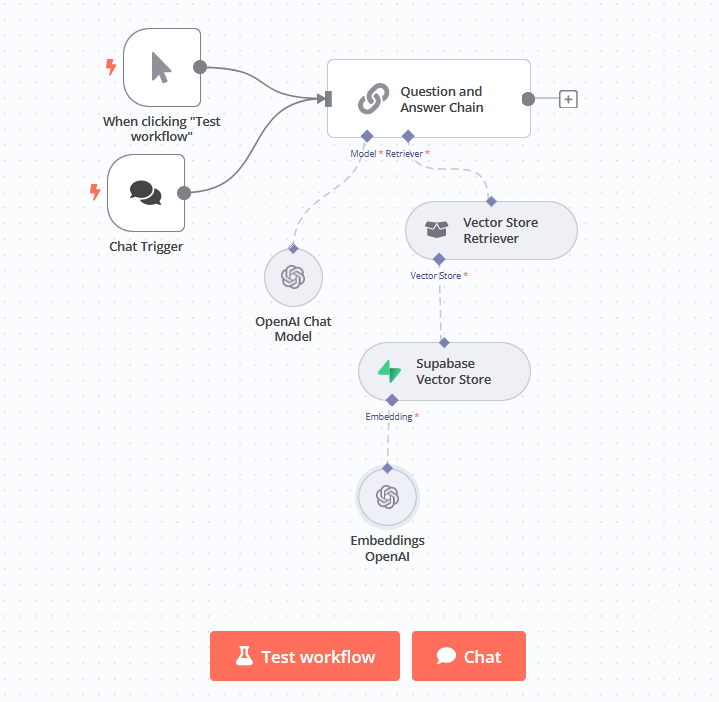
2d workflow: Create AI chatbot
The second workflow is where we build the actual chatbot. We'll use the Question and Answer chain node to connect LLM and the vector store. You can also test the chatbot directly in the workflow Canvas.
-
Add a manual trigger.
Select Manually from the nodes panel so that the workflow starts when the user types a question in a chat window. -
Add the Question and Answer Chain node.
Select Advanced AI, then the Question and Answer Chain from the nodes panel. -
Add the Model.
We’ll use the OpenAI Model, but you can select a different LLM is preferable. -
Vector Store Retriever.
Click the + button to the node. -
Connect Vector Store.
Finally, we need to connect to our Supabase Vector Store.
In the Operation Mode, select Retrieve Documents (For Agent/Chain).
In the Table Name, select From list and then choose the name of your Supabase table.Test the workflow by selecting the Chat tab at the bottom of the Canvas.
Wrap Up
Well done, you should now have a fully-functioning custom AI chatbot!
Integrate chatbot on your platform
Integrating an n8n chatbot with your platform is very straightforward. Click on the More info in the Chat popup window to get the code snippet to embed the chat on your website.
You can choose from CDN, Vue, React or npm.What’s next?
To enhance the capabilities of your chatbot, you can easily extend it in n8n with tools such as a calculator, memory or by adding your own custom code.